From time to time, you may notice that your laptop’s battery doesn’t stay charged as long as it should. This is sometimes due to the user constantly keeping the battery on mains power, or allowing it to only drop to 50% before recharging. Modern batteries are usually quite good at dealing with this, but every so often it’s a good idea to recalibrate your battery to get the best out of it.
You might want to check you’re laptop’s documentation, or check with the manufacturer to see how often you should do this. Sometimes they will say it’s not necessary, and sometimes they will say once a month, or once or twice a year. The response often depends on whom you speak to at the company and there isn’t a defined best practice. However, you can’t do any harm by performing a manual recalibration, so why not give it a go and see if it makes a difference?
Recalibration involves charging your battery to 100%, and then discharging it completely to 0%. Once that’s done you charge it back to 100% to complete the calibration.
The way to do this is easy. Begin by creating yourself a custom power plan in your windows power settings. You’ll find the power options in your control panel, and once you’re in the power options screen, click on “create a power plan”.

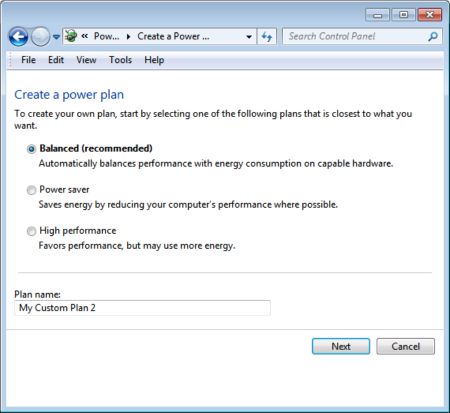
On the next screen you’ll want to choose “high performance” and give your new power plan a name. For the purposes of this exercise, let’s call it “calibration”. Click next, and you’ll get the opportunity to choose the settings for your new power plan. Make sure you change all the dropdown lists to “never”, so that your laptop doesn’t power anything down. Now make sure that your calibration power plan is selected and in use. You can find out by hovering your mouse over the battery icon in the taskbar of your computer.
Okay, now we’ve done this, the first step of the actual calibration is to charge your battery to full power. So plug your laptop into the mains and wait until the battery power meter reads 100%. If you hover your mouse over the power meter icon, it should read “fully charged”.
The second step is now to remove the power cord from your laptop and making sure your power plan is set to the calibration plan we created earlier, wait until the battery power reaches 0%. When your laptop reaches this, of course it will shutdown. Be sure that you aren’t running any software when you do this, otherwise you could potentially lose some work, although usually laptops will automatically save it’s current state before shutting itself off.
Finally, the last step is to completely recharge you laptop again back to 100%. So plug in your AC adapter, turn on your laptop and wait until the battery is fully charged again to 100%. Don’t turn off your computer while this is taking place to make sure you get a full charge. You should now have a recalibrated battery that will hopefully last a little longer.
You might want to check you’re laptop’s documentation, or check with the manufacturer to see how often you should do this. Sometimes they will say it’s not necessary, and sometimes they will say once a month, or once or twice a year. The response often depends on whom you speak to at the company and there isn’t a defined best practice. However, you can’t do any harm by performing a manual recalibration, so why not give it a go and see if it makes a difference?
Recalibration involves charging your battery to 100%, and then discharging it completely to 0%. Once that’s done you charge it back to 100% to complete the calibration.
The way to do this is easy. Begin by creating yourself a custom power plan in your windows power settings. You’ll find the power options in your control panel, and once you’re in the power options screen, click on “create a power plan”.

On the next screen you’ll want to choose “high performance” and give your new power plan a name. For the purposes of this exercise, let’s call it “calibration”. Click next, and you’ll get the opportunity to choose the settings for your new power plan. Make sure you change all the dropdown lists to “never”, so that your laptop doesn’t power anything down. Now make sure that your calibration power plan is selected and in use. You can find out by hovering your mouse over the battery icon in the taskbar of your computer.
Okay, now we’ve done this, the first step of the actual calibration is to charge your battery to full power. So plug your laptop into the mains and wait until the battery power meter reads 100%. If you hover your mouse over the power meter icon, it should read “fully charged”.
The second step is now to remove the power cord from your laptop and making sure your power plan is set to the calibration plan we created earlier, wait until the battery power reaches 0%. When your laptop reaches this, of course it will shutdown. Be sure that you aren’t running any software when you do this, otherwise you could potentially lose some work, although usually laptops will automatically save it’s current state before shutting itself off.
Finally, the last step is to completely recharge you laptop again back to 100%. So plug in your AC adapter, turn on your laptop and wait until the battery is fully charged again to 100%. Don’t turn off your computer while this is taking place to make sure you get a full charge. You should now have a recalibrated battery that will hopefully last a little longer.


0 comments:
Post a Comment